Have you ever wanted to push beyond boundaries, language-wise? Let’s dive into the world of Salesforce’s Lightning Web Components (LWC) and explore the concept of internationalization. You see, when you are creating an application that’s meant to be used globally, one of the key factors that you must ponder upon is language support. And that’s where internationalization & Custom Label in LWC comes in handy.
Fluent in Languages Beyond Code: A Quick Intro to Internationalization
Internationalization is a process that facilitates the adaptation of your product to different languages, regional differences, and technical requirements of a global market. It’s more than mere translation; it’s about giving your users a seamless experience by tailoring every aspect of your app, including date and time formats, numbers, currencies, and texts.
Now, you might be asking, how is this linked to LWC? To create a more accessible and user-friendly interface, Salesforce has integrated internationalization into LWC. It’s like a universal language translator embedded in your apps that understands and translates your components according to user locale.
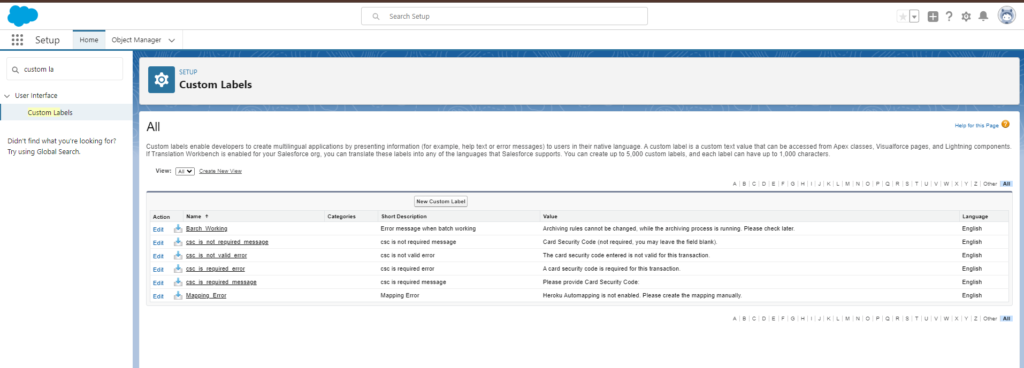
In Salesforce, creating a custom label allows you to define a text value that can be translated into different languages or used as a constant value in your Apex code, Visualforce pages, and Lightning components. Here are the steps to create a custom label in Salesforce:
- Login to Salesforce: Log in to your Salesforce Developer or Production environment.
- Navigate to Setup: Click on the “Setup.”
- Navigate to Custom Labels: In the Setup menu, you can either type “Custom Labels” in the Quick Find box or navigate to
User Interface-> Custom Labels. - OR Search for Custom Label in setup search bar
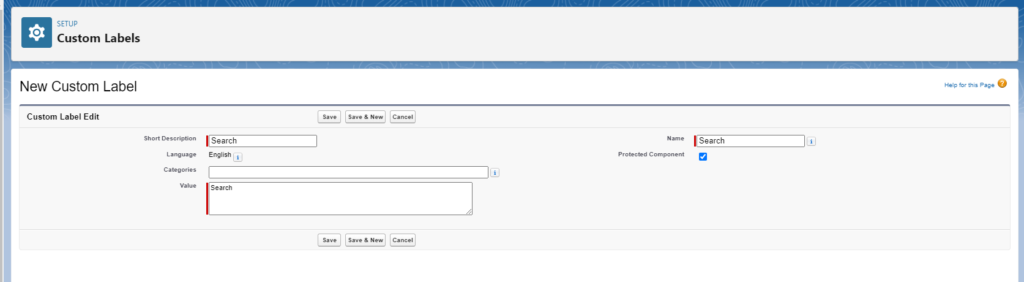
- Create a New Custom Label:
- Click on the “New Custom Label” button.
Deep Dive into Internationalization in Lightning Web Components
Let’s unpack this concept further, and take a careful, step-by-step approach towards building multilingual Lightning Components using internationalization.
Empowering your LWC with Locale
Locale here refers to the linguistic and regional settings (like language, country, and variant) of your users. LWC employs JavaScripts’ Intl, a built-in object for language-sensitive functions, allowing you to format numbers, dates, and strings as per the user locale.
Adapting Number Formats in LWC
For numerical values, LWC provides lightning-formatted-number, a component that formats numbers in a locale-sensitive way.
<lightning-formatted-number value={myValue} format-style="currency"
currency-code="USD"></lightning-formatted-number>
In this example, if your ‘myValue’ is 1234.56, it’ll display “$1,234.56” for en-US locale and “1.234,56 $” for fr-FR locale.
Aligning Dates and Times to the Locale
Now, let’s talk about dates, which can be formatted using the lightning-formatted-date-time component. You plug in your date value and specify the format, and it will adapt to the user’s locale.
<lightning-formatted-date-time value={myDate} year="numeric"
month="long" day="numeric" hour="2-digit" minute="2-digit">
</lightning-formatted-date-time>
For a ‘myDate’ value like ‘2019-03-26T10:20:00Z’, it can display “March 26, 2019, 10:20 AM” for en-US locale and “26 mars 2019 à 10:20” for fr-FR locale.
Solving the Puzzle of Multilingual Labels
To add another layer of internationalization, set up custom labels for your components that can be translated into different languages.
import labelName from '@salesforce/label/namespace.labelName';
After importing the custom label, bind it to your component.
<template>
    {labelName}
</template>
In this case, ‘labelName’ can be ‘Hello’ for English, ‘Hallo’ for German, ‘Bonjour’ for French, and so forth, depending on the user locale.
Road Testing Local Development Server
For seasoned developers, the ‘trial and error’ philosophy is an intrinsic part of the development journey. Fortunately, the Local Development Server allows you to preview your multilingual components before deploying them.
Run npm install -g @salesforce/lwc-dev-server and sfdx force:lightning:local:setup to install and set up the server. Once it’s ready, kickstart it using sfdx force:lightning:local:start. You can then add “?locale=” to your preview URL to test different locales.
Closing Thoughts
It’s evident that understanding how to implement internationalization within LWC is pivotal in the creation of globally relevant components. Remember, your end-goal should be to make your users feel at home, regardless of their language or regional preferences. Catering to their locale doesn’t only add to the user experience but it also enhances the accessibility of your application. Let’s make our apps speak the language of our users, one component at a time. Dive in, experiment, and explore the boundless possibilities with LWC. Happy coding!