In today’s fast-paced digital environment, real-time updates are not just a luxury; they are a necessity for maintaining engaging and interactive web applications. Implementing Real-Time Updates with Platform Events in LWC emerges as a gold standard for developers seeking to elevate their applications’ responsiveness and user experience. Whether you’re developing a simple notification system or a complex event-driven application, mastering how to use Platform Events in LWC can significantly uplift your project. This blog post will walk you through the essentials of integrating real-time updates seamlessly with LWC, complete with sample code and a real-time example to get you started.
Understanding Platform Events and LWC
What are Platform Events?
Platform Events facilitate event-driven architecture in Salesforce, allowing apps to communicate inside and outside your Salesforce environment. They are our building blocks for crafting real-time, responsive applications that can react to business events and user actions without the need for constant polling.
The Role of LWC in Modern Web Development
Lightning Web Components (LWC) is a modern framework for building lightweight, performant web applications. By combining LWC with Platform Events, developers can unleash a powerful synergy that brings real-time updates to the forefront of user experience, making your applications not just operative but genuinely interactive.
Step-by-Step Guide to Implementing Platform Events in LWC
Setting Up Platform Events
- Navigate to Setup in your Salesforce environment.
- Create a new Platform Event definition, specifying the event schema.
To create a new Platform Event definition in Salesforce and specify the event schema, follow these steps:
- Log in to your Salesforce Org: Access your Salesforce instance using your credentials.
- Navigate to Setup:
- Click on the gear icon in the top-right corner.
- Select “Setup” from the dropdown menu.
- Create a Platform Event:
- In the Quick Find box, type “Platform Events”.
- Click on “Platform Events” under the Integration section.
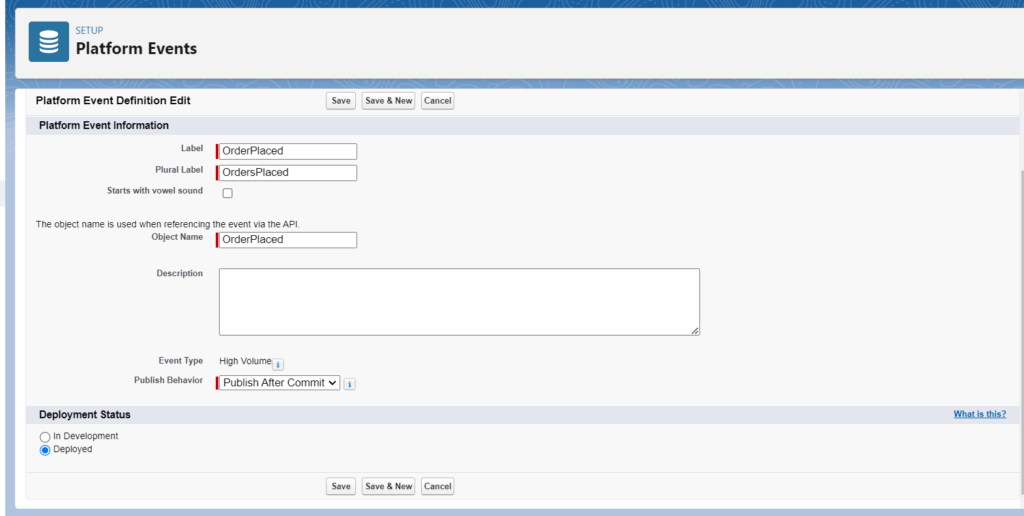
- Define the Platform Event:
- Click on the “New Platform Event” button.
- Fill in the necessary details:
- Label: The name of the event (e.g., “OrderPlaced”).
- Plural Label: The plural form of the event name (e.g., “OrdersPlaced”).
- API Name: Unique identifier for the event (auto-generated based on the label).
- Description: Description of the event (optional but recommended).
- Click “Next”.
- Define the Event Schema:
- In the “New Platform Event” wizard, you’ll define the schema of your event by adding fields.
- Click on the “New Field” button to add fields to your event.
- For each field, specify:
- Field Label: Human-readable name for the field.
- Field Name: API-friendly name for the field.
- Data Type: Select the appropriate data type for the field (e.g., Text, Number, Date/Time, etc.).
- Description: Description of the field (optional but recommended).
- Repeat this process to add all the necessary fields for your event.
- Click “Save” when you’re done defining the schema.
- Review and Activate:
- Review the details of your Platform Event definition.
- Ensure that the event schema meets your requirements.
- If everything looks good, click “Save & New Version” to activate the event.
- Select the appropriate security settings if prompted.
- Click “Activate” to activate the Platform Event.
- Access the Platform Event:
- Once activated, you can access your Platform Event definition from the “Platform Events” section in Setup.
- You can use this definition to publish events and subscribe to them in your Salesforce org.
Sample Code to Kickstart Your Implementation
// subscriberLWC.js
import { LightningElement, wire } from 'lwc';
import { subscribe, APPLICATION_SCOPE, unsubscribe } from 'lightning/messageService';
import SAMPLE_PLATFORM_EVENT from '@salesforce/messageChannel/Sample__c';

export default class SubscriberLWC extends LightningElement {
    subscription = null;

    connectedCallback() {
        this.subscribeToEvent();
    }

    subscribeToEvent() {
        if (this.subscription) {
            return;
        }
        this.subscription = subscribe(
            this,
            SAMPLE_PLATFORM_EVENT,
            (message) => {
                this.handleMessage(message);
            },
            { scope: APPLICATION_SCOPE }
        );
    }

    handleMessage(message) {
        // Handle the message
        console.log('Received message ', message);
    }

    disconnectedCallback() {
        unsubscribe(this.subscription);
        this.subscription = null;
    }
}
This sample code demonstrates how to subscribe to a Platform Event in LWC, showcasing how you can listen and react to events within your application.
Testing Your Setup
Ensure your setup works by publishing events in your Salesforce environment and observing the responses in your LWC. Tools like Workbench or Salesforce Inspector can be invaluable for this testing phase.
Real-Time Example: Bringing Updates to Life
Crafting a Chat Application
A chat application serves as an excellent example of real-time updates in action. Each message sent by a user can be published as a Platform Event, and LWC components can subscribe to these events to display new messages instantaneously.
Key Considerations for Real-Time Data Flow
- Scalability: Ensure your application can handle increasing loads.
- Security: Implement proper access controls for event publication and subscription.
- Error Handling: Gracefully manage subscription errors or missed events.
Tips and Best Practices
- Debugging Common Issues: Use Salesforce’s debugging tools and logs to trace and resolve issues.
- Optimizing Performance: Limit the number of subscribed events and debulk your LWC code to ensure peak performance.
Resources and Further Reading
- Official Salesforce Documentation on Platform Events
- LWC Developer Guide
- Salesforce Developers Blog
Utilize these resources to deepen your understanding and refine your implementation approach.
Conclusion
Integrating Platform Events with LWC provides a robust solution for real-time updates in web applications. By following the guide above, including setting up your Platform Events, leveraging sample code, and considering a real-time example, you’re well on your way to implementing dynamic, responsive web components. Remember, the key to success lies in understanding the basics, practicing with examples, and continuously refining your approach based on feedback and performance metrics.
Resource : Subscribe to Platform Event Notifications in a Lightning Component
Explore, learn, and innovate. Happy coding!