Creating an engaging user interface is crucial for any application, and a star rating component is a fantastic way to allow users to provide feedback in a fun and interactive way. In this blog post, I’ll walk you through the steps to Create a Star Rating Component in LWC. So, let’s make your app’s feedback experience more delightful!
Step-by-Step Guide to Create a Star Rating Component in LWC
Creating a star rating component involves a few steps – from setting up the LWC environment to writing the actual code for the functionality. Let’s break it down.
To create the ⭐⭐⭐⭐⭐ Star Rating component we are going to use External JS.
- Click here to download js
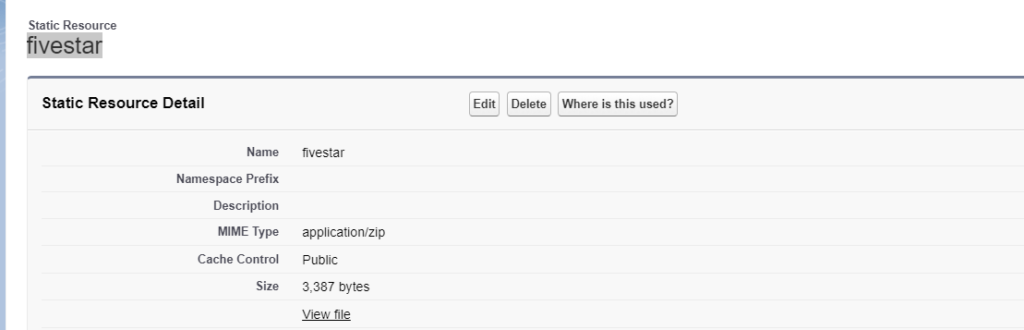
- Create a static resource named “fivestar“
Creating the LWC Component
Once your environment is ready, it’s time to create the LWC component. Here’s how:
- Open Visual Studio Code and create a new LWC component.
- Name your component, something like “fiveStarRatingUpdated” to keep it descriptive.
fiveStarRatingUpdated.html
<!--
@description :
@author : Abhishek Verma
@group :
@last modified on : 02-15-2024
@last modified by : Abhishek Verma
-->
<template>
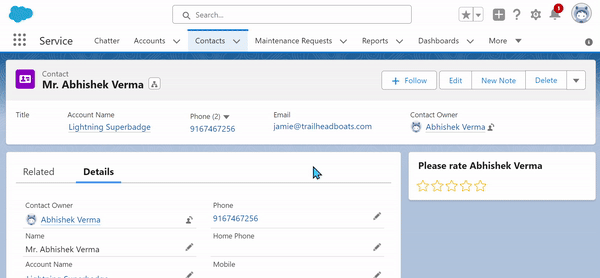
<lightning-card variant="Narrow" title="Please rate Abhishek Verma">
<div class="slds-p-horizontal_small" align="center">
<ul class={starClass}></ul>
</div>
</lightning-card>
</template>
fiveStarRatingUpdated.js
import fivestar from '@salesforce/resourceUrl/fivestar';
import { LightningElement, api } from 'lwc';
import { ShowToastEvent } from 'lightning/platformShowToastEvent';
import { loadStyle, loadScript } from 'lightning/platformResourceLoader';

// add constants here
const ERROR_TITLE = 'Error loading five-star';
const ERROR_VARIANT = 'error';
const EDITABLE_CLASS = 'c-rating';
const READ_ONLY_CLASS = 'readonly c-rating';

export default class FiveStarRating extends LightningElement {
  //initialize public readOnly and value properties
  @api
  readOnly;
  @api
  value;

  editedValue;
  isRendered;

  //getter function that returns the correct class depending on if it is readonly
  get starClass() {
    return this.readOnly ? READ_ONLY_CLASS : EDITABLE_CLASS;
  }

  // Render callback to load the script once the component renders.
  renderedCallback() {
    if (this.isRendered) {
      return;
    }
    this.loadScript();
    this.isRendered = true;
  }

  //Method to load the 3rd party script and initialize the rating.
  //call the initializeRating function after scripts are loaded
  //display a toast with error message if there is an error loading script
  loadScript() {
    Promise.all([
      loadScript(this, fivestar + '/rating.js'),
      loadStyle(this, fivestar + '/rating.css')
    ]).then(() => {
      this.initializeRating();
    })
    .catch(error => {
      const toast = new ShowToastEvent({
          title: ERROR_TITLE,
          message: error.message,
          variant: ERROR_VARIANT,
      });
      this.dispatchEvent(toast);
    });
  }

  initializeRating() {
    let domEl = this.template.querySelector('ul');
    let maxRating = 5;
    let self = this;
    let callback = function (rating) {
      self.editedValue = rating;
      self.ratingChanged(rating);
    };
    this.ratingObj = window.rating(
      domEl,
      this.value,
      maxRating,
      callback,
      this.readOnly
    );
  }

  // Method to fire event called ratingchange with the following parameter:
  // {detail: { rating: CURRENT_RATING }}); when the user selects a rating
  ratingChanged(rating) {
    const ratingchangeEvent = new CustomEvent('ratingchange', {
      detail: {
        rating: rating
      }
    });
    this.dispatchEvent(ratingchangeEvent);
  }
}
Conclusion
Congratulations! You’ve now created a fully functional star rating component in LWC. This component not only adds an interactive element to your application but also allows you to gather valuable feedback from your users in a visually appealing manner. Remember, the best way to learn is by doing, so I encourage you to experiment with different styles, animations, or even the number of stars.
Subscribe to my YouTube channel for more exciting videos on salesforce 👇