In the ever-evolving world of web development, keeping users informed and engaged is crucial. This rings true especially in the Salesforce ecosystem, where Lightning Web Components (LWC) open up a myriad of possibilities for creating dynamic, responsive applications. Today, we’re diving deep into the art of Implementing Custom Notifications and Toast Messages in Lightning Web Components, a must-have skill for Salesforce Developers looking to enrich user experience and facilitate smoother interactions within their applications.
Introduction
Ever been on a website and received a small, unobtrusive message on your screen informing you about something you just did or need to know? That’s a toast message in action! Likewise, custom notifications can be a game-changer in how users perceive and interact with your application. They can be the difference between a user feeling lost and feeling guided. This article will explore how to Implementing Custom Notifications and Toast Messages in Lightning Web Components, blending functionality with the seamless user experience.
Understanding Notifications & Toasts in LWC
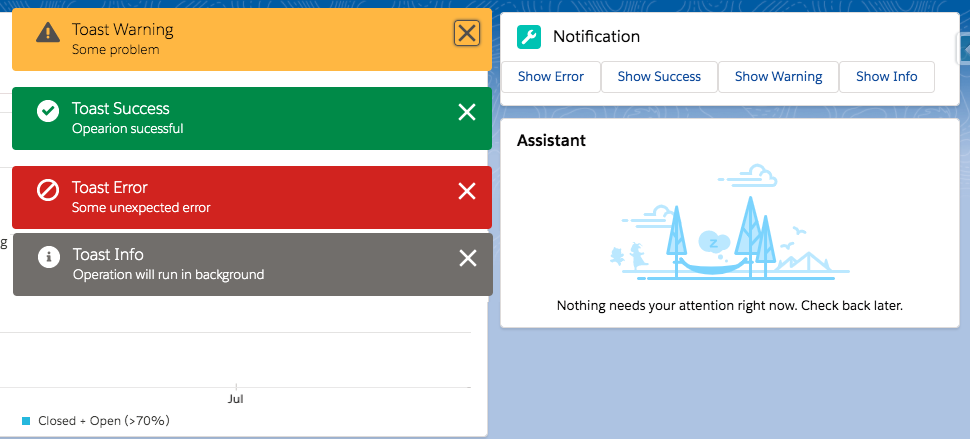
Before we dive into the how-to, let’s understand what we’re working with. Toast messages are brief, auto-expiring notifications that provide feedback to a user’s action in an application. They’re like the polite friend who taps you on the shoulder to tell you something important and then disappears before overstaying their welcome.
Custom notifications, on the other hand, can be a bit more persistent and tailored. They can pop up on the user’s screen to deliver personalized messages based on specific triggers within your application.
The Significance of User Feedback
- Immediate Response: In the fast-paced digital environment, users appreciate immediate feedback on their actions. It reassures them that the system is responsive.
- Guidance and Error Handling: Notifications and toasts can guide users through complex workflows or alert them to errors that need attention.
- Enhanced User Experience: Thoughtfully implemented notifications can significantly enhance the user experience, encouraging users to engage more deeply with your application.
Implementing Toast Messages in LWC
Creating toast messages in Lightning Web Components involves using the ShowToastEvent from the lightning/platformShowToastEvent module. Here’s a step-by-step guide to get you started.
Step 1: Import the ShowToastEvent
First up, you need to import the ShowToastEvent in your LWC JavaScript file.
import { ShowToastEvent } from 'lightning/platformShowToastEvent';
Step 2: Dispatch the Toast Event
Next, create a method to dispatch the toast event whenever you need to show a toast message. Customize the message by setting the title, message, variant, and other options.
showSuccessToast() {
    const event = new ShowToastEvent({
        title: 'Success',
        message: 'Operation completed successfully!',
        variant: 'success',
        mode: 'dismissable'
    });
    this.dispatchEvent(event);
}
Step 3: Call Your Method
Call your method at the appropriate place within your component’s logic, such as after a successful data operation.
// Assuming you have a method that performs some data operation
performDataOperation() {
    // Data operation code here...

    // Show success toast
    this.showSuccessToast();
}
Crafting Custom Notifications in LWC
While toast messages cover many notification needs, there may be scenarios where you need something more tailored. Creating a custom notification component in LWC allows you to have complete control over how notifications appear and behave.
Designing Your Notification Component
For a custom notification, you’ll design a new Lightning Web Component. This involves creating the component files (html, js, css) and designing your notification UI in the HTML template. Flexibility is key here; your notification can be as simple or complex as needed.
Implementing Custom Notifications in LWC
1. Designing the Notification Component
The first step is to create a notification component that encapsulates the structure, styling, and behavior of the custom notification. This component typically consists of HTML markup, CSS styling, and JavaScript logic to handle visibility, content, and dismissal of the notification.
Example Notification Component (notificationComponent.html):
<template>
    <div class="custom-notification" if:true={isVisible}>
        <div class="notification-content">
            <span>{message}</span>
        </div>
        <button class="close-btn" onclick={dismissNotification}>
            <lightning-icon icon-name="utility:close" size="small"></lightning-icon>
        </button>
    </div>
</template>
.custom-notification {
    position: fixed;
    top: 20px;
    right: 20px;
    background-color: #f0f0f0;
    border: 1px solid #ccc;
    border-radius: 5px;
    padding: 10px;
    box-shadow: 0 2px 5px rgba(0, 0, 0, 0.1);
    animation: slideIn 0.3s ease-in-out;
}

.notification-content {
    margin-right: 25px;
}

.close-btn {
    position: absolute;
    top: 5px;
    right: 5px;
    background: none;
    border: none;
    cursor: pointer;
}
import { LightningElement, api } from 'lwc';

export default class NotificationComponent extends LightningElement {
    @api message;
    isVisible = true;

    dismissNotification() {
        this.isVisible = false;
    }
}
2. Integrating the Notification Component
Once the notification component is designed, integrate it into your Lightning Web Components application where notifications are required. You can dynamically pass messages and other parameters to the notification component based on specific events or conditions within the application.
Example Usage:
<template>
    <!-- Other components and markup -->
    <c-notification-component message={notificationMessage}></c-notification-component>
</template>
import { LightningElement, track } from 'lwc';

export default class MyComponent extends LightningElement {
    @track notificationMessage = '';

    handleButtonClick() {
        // Triggering a custom notification
        this.notificationMessage = 'Custom notification message';
    }
}
Adding Interactivity
Don’t forget to add interactivity to your notifications. This could be close buttons, timers to auto-hide the notification, or actions the user can take directly from the notification.
Styling Your Notification
With CSS, you have the power to make your notification blend in perfectly with your application’s design. Whether it’s integrating your brand colors, choosing the right animation, or ensuring your notification is responsive across devices, the finer details matter.
Conclusion
Implementing custom notifications and toast messages in your Salesforce Lightning Web Components can radically enhance user experience, providing timely feedback and guiding users through your application with ease. Remember, the key to effective notifications is not just in how they look, but in how well they communicate. By following the steps outlined above, you’re well on your way to creating notifications that are not only functional but also engaging and user-friendly. Happy coding, and may your user interactions be ever smooth and informed!