
Table of Contents
- Introduction
- Salesforce Security Overview
- Understanding Profiles
- 3.1. What are Profiles?
- 3.2. Key Features of Profiles
- 3.3. Benefits of Using Profiles
- 3.4. Steps to Create a Profile
- 3.5. Profile Best Practices
- Exploring Permission Sets
- 4.1. Introduction to Permission Sets
- 4.2. Advantages of Permission Sets
- 4.3. Creating a Permission Set
- 4.4. Real-time Examples of Permission Sets
- Custom Permissions: Extending Security Control
- 5.1. Introduction to Custom Permissions
- 5.2. Use Cases for Custom Permissions
- 5.3. How to Create Custom Permissions
- 5.4. Leveraging Custom Permissions for Enhanced Security
- Data Access: Beyond Profiles and Permission Sets
- 6.1. Controlling Data Access in Salesforce
- 6.2. Overview of Object-Level Security
- 6.3. Understanding Organization-Wide Defaults (OWD)
- 6.4. Real-time Examples of OWD and Sharing Rules
- 6.5. Setting Sharable Salesforce Data Access Levels
- Custom Settings: Fine-tuning Salesforce Security
- 7.1. Introduction to Custom Settings
- 7.2. Implementing Custom Settings for Security
- 7.3. Improving Security with Custom Setting Real-time Examples
- Best Practices for Salesforce Security Administration
- 8.1. Regularly Review and Update Security Settings
- 8.2. Minimize the Use of Unrestricted Profiles
- 8.3. Enable Two-Factor Authentication (2FA)
- 8.4. Monitor and Audit User Permissions
- 8.5. Stay Informed about Salesforce Security Updates
- Conclusion
Introduction
Welcome to our comprehensive guide on Salesforce security! In this blog post, we will delve into the essential components of Salesforce security, focusing on profiles, permission sets, and custom permissions. This blog will help you understand these crucial aspects and guide you through the process of creating and managing them effectively. So, let’s begin our journey towards strengthening your Salesforce security!
Salesforce Security Overview
Before we dive into the details of profiles, permission sets, and custom permissions, let’s first gain a high-level understanding of Salesforce security. Salesforce offers a robust security model that ensures data confidentiality, integrity, and accessibility for organizations of all sizes. With its granular control over user permissions, Salesforce allows administrators to define who can access, view, modify, and delete various data objects within the platform.
To achieve this level of security, Salesforce employs a combination of different features, including profiles, permission sets, custom permissions, organization-wide defaults (OWD), sharing rules, and more. These components work together synergistically to create a layered security framework that safeguards your organization’s sensitive data.
Now that we have a broader view of Salesforce security, let’s deep dive into profiles, permission sets, and custom permissions, starting with profiles.
Understanding Profiles
3.1. What are Profiles?
Profiles in Salesforce serve as a foundational component for managing user permissions and access levels. A profile is a collection of settings and permissions that determine what actions a user can perform and what records or data they can view, edit, or delete. In simpler terms, profiles define the baseline level of access for a user within the Salesforce ecosystem.
3.2. Key Features of Profiles
- Object-Level Security
- Field-Level Security
- User Permissions
- Record Access
- App and Tab Permissions
3.3. Benefits of Using Profiles
Using profiles in Salesforce offers several benefits, including:
- Streamlined User Access and Permissions
- Reduced Risk of Unauthorized Data Exposure
- Enhanced Data Integrity and Confidentiality
- Improved User Productivity and Efficiency
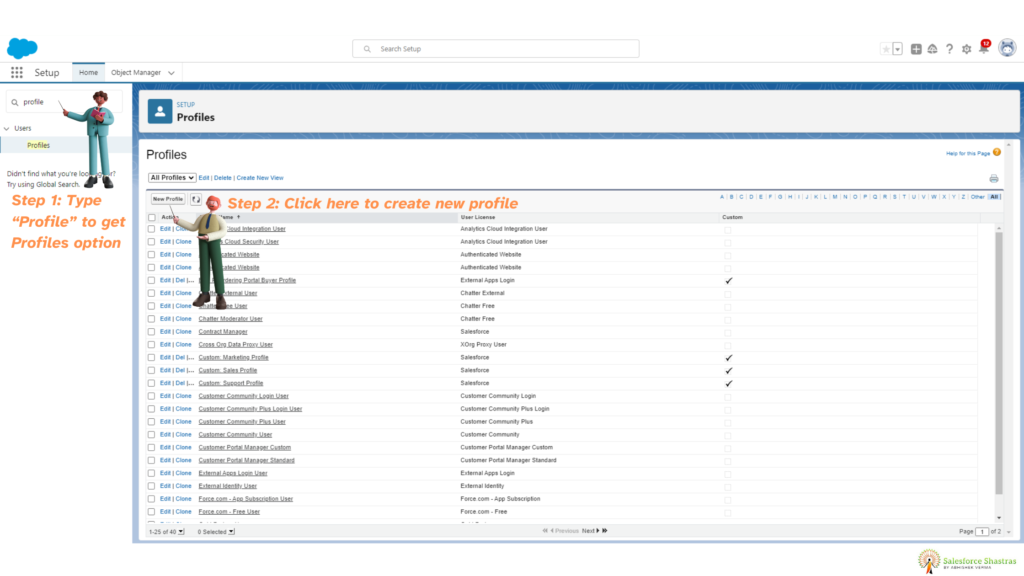
3.4. Steps to Create a Profile
Creating a profile in Salesforce involves the following steps:
- Log in to your Salesforce account as an administrator.
- Navigate to the “Setup” menu by clicking on the gear icon in the top-right corner.
- In the left sidebar, under the “Manage Users” section, click on “Profiles.”
- Click on the “New Profile” button.
- Provide a unique name and description for the profile.
- Customize the various settings, permissions, and access levels according to your requirements.
- Save the profile once you have finished configuring the desired settings.
3.5. Profile Best Practices
To ensure optimal security and usability, keep the following best practices in mind while managing profiles:
- Regularly review and update profile settings as per changing business needs.
- Avoid creating overlapping profiles to prevent confusion and permission conflicts.
- Minimize the use of the “View All” and “Modify All” permissions to limit data exposure and potential data corruption.
- Perform thorough testing and consider using sandboxes to evaluate the impact of profile changes before implementing them in a production environment.
Now that we have covered profiles, let’s move on to exploring permission sets.
Exploring Permission Sets
4.1. Introduction to Permission Sets
While profiles offer a baseline level of access, permission sets provide an additional layer of flexibility by granting additional permissions to particular users or groups. Think of permission sets as an extension to profiles, enabling administrators to grant specific permissions beyond what a user’s profile allows.
4.2. Advantages of Permission Sets
Using permission sets in Salesforce offers the following advantages:
- Fine-Grained Control over User Permissions
- Dynamically Assigning Permissions to Users
- Enhancing User Flexibility and Productivity
- Simplifying User Management
4.3. Creating a Permission Set
To create a permission set in Salesforce, follow these steps:
- Log in to your Salesforce account as an administrator.
- Navigate to the “Setup” menu by clicking on the gear icon in the top-right corner.
- In the left sidebar, under the “Manage Users” section, click on “Permission Sets.”
- Click on the “New Permission Set” button.
- Provide a unique name and description for the permission set.
- Select the desired system permissions, object permissions, and user permissions.
- Save the permission set.
4.4. Real-time Examples of Permission Sets
Here are a few real-life examples where permission sets can be useful:
- Granting temporary access to a specific object or feature for a limited period.
- Allowing a user to export data from Salesforce but without giving them administrative privileges.
- Enabling access to a custom app or a third-party integration for a specific user or group.
Permission sets offer granular control over user permissions beyond what profiles offer, making them a valuable tool in your Salesforce security arsenal.
Next, let’s dive into custom permissions and how they can enhance your security control.
Custom Permissions: Extending Security Control
5.1. Introduction to Custom Permissions
Custom permissions in Salesforce allow administrators to define their own permissions beyond the standard set offered by Salesforce. These custom permissions can then be assigned to profiles or permission sets, providing administrators with even more control over user access.
5.2. Use Cases for Custom Permissions
Custom permissions can be useful in various scenarios, such as:
- Limiting access to sensitive data or business processes based on specific criteria.
- Controlling access to premium features or functionalities based on subscription levels.
- Enforcing compliance requirements by allowing access to specific records or fields only to authorized users.
5.3. How to Create Custom Permissions
To create custom permissions in Salesforce, follow these steps:
- Log in to your Salesforce account as an administrator.
- Navigate to the “Setup” menu by clicking on the gear icon in the top-right corner.
- In the left sidebar, under the “Platform Tools” section, click on “Custom Code” and select “Custom Permissions.”
- Click on the “New Custom Permission” button.
- Provide a unique name and description for the custom permission.
- Define the desired settings, such as the custom permission license and access requirements.
- Save the custom permission.
By creating and leveraging custom permissions, administrators gain finer control over granting or denying access to specific functionalities, ensuring a more secure Salesforce environment.
Now that we have covered profiles, permission sets, and custom permissions, let’s explore data access control beyond these components.
Data Access: Beyond Profiles and Permission Sets
6.1. Controlling Data Access in Salesforce
In addition to profiles and permission sets, Salesforce offers other mechanisms to control data access and visibility. Let’s explore some of these key elements:
6.2. Overview of Object-Level Security
Object-level security refers to the control and management of user access to specific objects (such as accounts, contacts, or opportunities) within Salesforce. With object-level security, administrators can define which users or profiles can perform actions on specific objects, including creating, reading, updating, or deleting records.
6.3. Understanding Organization-Wide Defaults (OWD)
Organization-Wide Defaults (OWD) in Salesforce determine the baseline data access settings for various objects across the organization. OWD settings define the default level of access that all users have to records within specific objects.
6.4. Real-time Examples of OWD and Sharing Rules
To understand OWD and sharing rules better, let’s consider a couple of real-life examples:
- Example 1: In a sales organization, the OWD setting for accounts might be set to “Private,” ensuring that each sales representative can only access and modify their own assigned accounts. Sharing rules can then be used to provide extended access to relevant accounts based on specific criteria, such as opportunity ownership or territory.
- Example 2: In a customer support organization, the OWD setting for cases might be set to “Public Read/Write,” allowing all support agents to view and edit cases. However, sharing rules can be created to restrict access to sensitive cases or escalate certain cases to a specialized support team.
By combining OWD and sharing rules, administrators can establish the appropriate level of data access and visibility for different users and roles within the organization.
6.5. Setting Sharable Salesforce Data Access Levels
To configure data access levels within Salesforce, follow these steps:
- Log in to your Salesforce account as an administrator.
- Navigate to the “Setup” menu by clicking on the gear icon in the top-right corner.
- In the left sidebar, under the “Security” section, click on “Sharing Settings.”
- Review and adjust the organization-wide defaults (OWD) for relevant objects.
- Create sharing rules to extend or restrict access to specific records or data.
By leveraging these data access control mechanisms, administrators can ensure that Salesforce data remains secure and accessible to the right users at the right time.
As we near the end of our blog post, let’s take a look at custom settings and how they can further enhance Salesforce security.
Custom Settings: Fine-tuning Salesforce Security
7.1. Introduction to Custom Settings
Custom settings in Salesforce provide a way to store custom data at the organization, profile, or user level. As they allow administrators to define and store custom data, they can be used to fine-tune various aspects of Salesforce security.
7.2. Implementing Custom Settings for Security
Custom settings can be leveraged to enhance security in several ways, including:
- Storing sensitive configuration data securely outside of code.
- Controlling access to specific features or functionalities based on custom setting values.
- Defining security-related thresholds or limits specific to your organization.
7.3. Improving Security with Custom Setting Real-time Examples
Here are a few real-time examples of how custom settings can improve Salesforce security:
- Example 1: Use a custom setting to store an encryption key or API credentials securely, ensuring sensitive information is not hard-coded within the application.
- Example 2: Leverage a custom setting to define the maximum number of login attempts allowed within a specific time frame, adding an extra layer of security against brute force attacks.
By harnessing the power of custom settings, administrators can tailor Salesforce security according to their organization’s unique requirements.
Best Practices for Salesforce Security Administration
8.1. Regularly Review and Update Security Settings
Security requirements and business needs can change over time. Stay proactive by regularly reviewing and updating your security settings to ensure they align with your organization’s evolving landscape.
8.2. Minimize the Use of Unrestricted Profiles
Avoid assigning unrestricted profiles to users whenever possible. Instead, rely on a combination of profiles, permission sets, and custom permissions to achieve the necessary level of access control.
8.3. Enable Two-Factor Authentication (2FA)
Two-Factor Authentication (2FA) adds an extra layer of security to user logins by requiring a second form of authentication, such as a temporary code or biometric verification. Enable 2FA to further protect sensitive Salesforce data.
8.4. Monitor and Audit User Permissions
Periodically review user permissions and access levels to ensure they are still relevant and necessary. Remove any unnecessary or outdated permissions to minimize the risk of unauthorized data exposure.
8.5. Stay Informed about Salesforce Security Updates
Salesforce regularly releases security updates, enhancements, and best practices. Stay informed about these updates through official Salesforce documentation, blogs, and community forums to ensure your organization stays up to date with the latest security measures.
Conclusion
In conclusion, Salesforce security is of utmost importance to safeguard your organization’s valuable data and ensure compliance with data protection regulations. By understanding and effectively utilizing profiles, permission sets, custom permissions, and other data access control mechanisms, you can establish a robust and secure Salesforce environment tailored to your organization’s unique requirements. Implementing best practices, such as regularly reviewing security settings, enabling two-factor authentication, and staying informed about security updates, will further strengthen your Salesforce security strategy.
Remember, maintaining a balance between accessibility and security is key. Continuously evaluate and fine-tune your security configurations to provide the right level of access to the right people, ensuring optimal productivity, usability, and data protection within the Salesforce ecosystem.

Thanks for your personal marvelous posting! I certainly enjoyed reading it, you are a great author.I will ensure that I
bookmark your blog and definitely will come back sometime soon. I want
to encourage continue your great writing, have a nice
afternoon!